
I. Định nghĩa
1. What is Kubeadm?
Kubeadm là một công cụ để thiết lập cụm Kubernetes tối thiểu mà không cần cấu hình phức tạp. Ngoài ra, Kubeadm giúp toàn bộ quá trình trở nên dễ dàng bằng cách chạy một loạt các bước kiểm tra trước để đảm bảo rằng máy chủ có tất cả các thành phần và cấu hình cần thiết để chạy Kubernetes.
2. Kubeadm Setup Prerequisites
– Tối thiểu hai node Ubuntu [master & worker]. Bạn có thể có nhiều nút worker hơn theo yêu cầu của bạn.
– Nút master phải có tối thiểu 2 vCPU và RAM 2GB. Đối với các nút worker, nên sử dụng tối thiểu 1vCPU và RAM 2 GB.
– Phạm vi mạng 10.X.X.X/X với IP tĩnh cho nút master và nút worker. Chúng tôi sẽ sử dụng dải 192.x.x.x làm phạm vi mạng cho pod network được sử dụng bởi plugin Calico.
3. How Does Kubeadm Work?
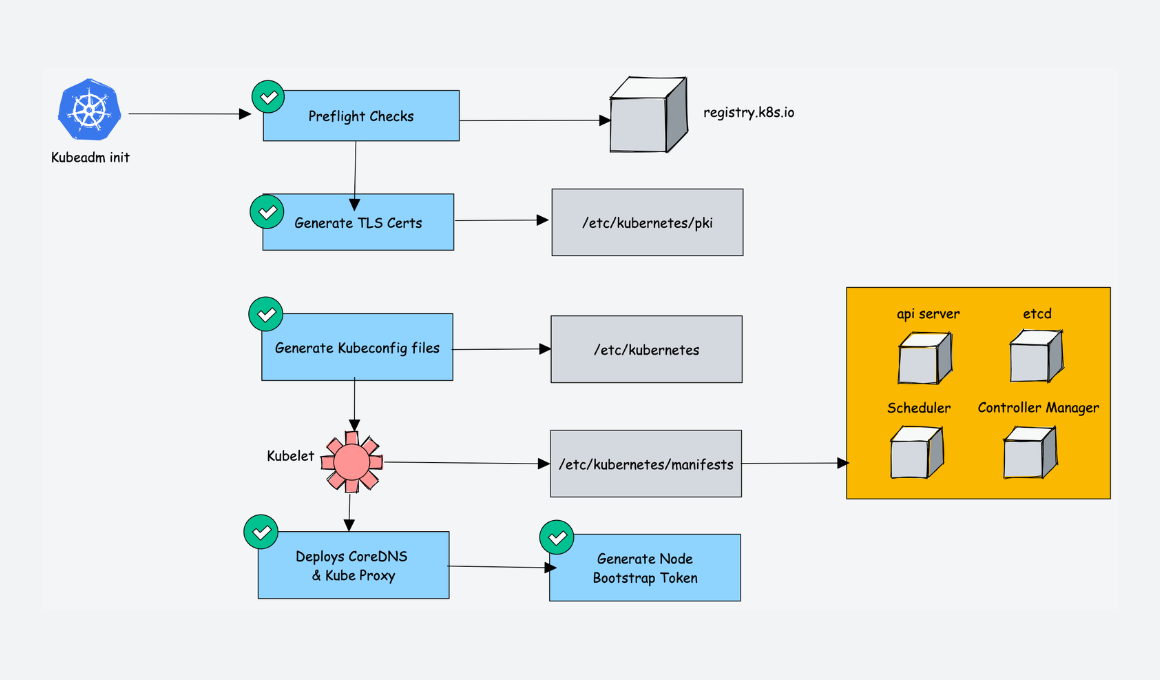
Khi bạn khởi tạo cụm Kubernetes bằng Kubeadm, nó sẽ thực hiện như sau:
– Đầu tiên, nó chạy tất cả các bước kiểm tra trước để xác thực trạng thái hệ thống và tải xuống tất cả các required cluster container images từ registry.k8s.io container registry.
– Sau đó, nó tạo các chứng chỉ TLS cần thiết và lưu trữ chúng trong thư mục /etc/kubernetes/pki.
– Tiếp theo, nó tạo tất cả các kubeconfig files cho các thành phần cluster trong thư mục /etc/kubernetes.
– Sau đó, dịch vụ kubelet khởi động tạo các static pod manifests cho tất cả các thành phần cụm và lưu nó vào thư mục /etc/kubernetes/manifests.
– Tiếp theo, nó khởi động tất cả các thành phần control plane từ các static pod manifests ở trên.
– Sau đó cài đặt core DNS and Kubeproxy components
– Sau cùng nó tạo ra các node bootstrap token
– Worker nodes sử dụng bootstrap token để join vào control plane
4. Kubernetes Cluster Important Configurations
| Configuration | Location |
|---|---|
| Static Pods Location (etcd, api-server, controller manager and scheduler) | /etc/kubernetes/manifests |
| TLS Certificates location (kubernetes-ca, etcd-ca and kubernetes-front-proxy-ca) | /etc/kubernetes/pki |
| Admin Kubeconfig File | /etc/kubernetes/admin.conf |
| Kubelet configuration | /var/lib/kubelet/config.yaml |
5. Kubernetes Cluster Setup Using Kubeadm
– Install container runtime on all nodes- We will be using cri-o.
– Install Kubeadm, Kubelet, and kubectl on all the nodes.
– Initiate Kubeadm control plane configuration on the master node.
– Save the node join command with the token.
– Install the Calico network plugin (operator).
– Join the worker node to the master node (control plane) using the join command.
– Validate all cluster components and nodes.
– Install Kubernetes Metrics Server
– Deploy a sample app and validate the app
II. Cài đặt
1. Step 1: Enable iptables Bridged Traffic on all the Nodes
– Execute the following commands on all the nodes for IPtables to see bridged traffic
cat <<EOF | sudo tee /etc/modules-load.d/k8s.conf
overlay
br_netfilter
EOF
sudo modprobe overlay
sudo modprobe br_netfilter
# sysctl params required by setup, params persist across reboots
cat <<EOF | sudo tee /etc/sysctl.d/k8s.conf
net.bridge.bridge-nf-call-iptables = 1
net.bridge.bridge-nf-call-ip6tables = 1
net.ipv4.ip_forward = 1
EOF
# Apply sysctl params without reboot
sudo sysctl --system
2. Step 2: Disable swap on all the Nodes
sudo swapoff -a
(crontab -l 2>/dev/null; echo "@reboot /sbin/swapoff -a") | crontab - || true
3. Step 3: Install CRI-O Runtime On All The Nodes
The basic requirement for a Kubernetes cluster is a container runtime. You can have any one of the following container runtimes.
- CRI-O
- containerd
- Docker Engine (using cri-dockerd)
Note: We are using cri-o instead if containerd because, in Kubernetes certification exams, cri-o is used as the container runtime in the exam clusters.
- Execute the following commands on all the nodes to install required dependencies and the latest version of CRIO.
sudo apt-get update -y
sudo apt-get install -y software-properties-common curl apt-transport-https ca-certificates
curl -fsSL https://pkgs.k8s.io/addons:/cri-o:/prerelease:/main/deb/Release.key | gpg --dearmor -o /etc/apt/keyrings/cri-o-apt-keyring.gpg
echo "deb [signed-by=/etc/apt/keyrings/cri-o-apt-keyring.gpg] https://pkgs.k8s.io/addons:/cri-o:/prerelease:/main/deb/ /" | tee /etc/apt/sources.list.d/cri-o.list
sudo apt-get update -y
sudo apt-get install -y cri-o
sudo systemctl daemon-reload
sudo systemctl enable crio --now
sudo systemctl start crio.service
Install crictl: tiện ích CLI để tương tác với các containers được tạo bởi container runtime.
VERSION="v1.28.0"
wget https://github.com/kubernetes-sigs/cri-tools/releases/download/$VERSION/crictl-$VERSION-linux-amd64.tar.gz
sudo tar zxvf crictl-$VERSION-linux-amd64.tar.gz -C /usr/local/bin
rm -f crictl-$VERSION-linux-amd64.tar.gz
- When you use container runtimes other than Docker, you can use the crictl utility to debug containers on the nodes
4. Step 4: Install Kubeadm & Kubelet & Kubectl on all Nodes
- Download the GPG key for the Kubernetes APT repository on all the nodes.
KUBERNETES_VERSION=1.29
sudo mkdir -p /etc/apt/keyrings
curl -fsSL https://pkgs.k8s.io/core:/stable:/v$KUBERNETES_VERSION/deb/Release.key | sudo gpg --dearmor -o /etc/apt/keyrings/kubernetes-apt-keyring.gpg
echo "deb [signed-by=/etc/apt/keyrings/kubernetes-apt-keyring.gpg] https://pkgs.k8s.io/core:/stable:/v$KUBERNETES_VERSION/deb/ /" | sudo tee /etc/apt/sources.list.d/kubernetes.list
sudo apt-get update -y
- Bạn có thể sử dụng các lệnh sau để tìm phiên bản mới nhất
apt-cache madison kubeadm | tac
sudo apt-get install -y kubelet kubeadm kubectl
sudo apt-mark hold kubelet kubeadm kubectl
=> Bây giờ chúng ta đã có tất cả các tiện ích và công cụ cần thiết để định cấu hình các thành phần Kubernetes bằng kubeadm.
- Add the node IP to
KUBELET_EXTRA_ARGS
sudo apt-get install -y jq
local_ip="$(ip --json addr show eth0 | jq -r '.[0].addr_info[] | select(.family == "inet") | .local')"
cat > /etc/default/kubelet << EOF
KUBELET_EXTRA_ARGS=--node-ip=$local_ip
EOF
5. Bước 5: Khởi tạo Kubeadm trên Master Node để thiết lập Control Plane
- Execute the commands in this section only on the master node.
- If you are using a Private IP for the master Node,
Set the following environment variables. Replace 10.0.0.10 with the IP of your master node.
IPADDR="10.0.0.10"
NODENAME=$(hostname -s)
POD_CIDR="192.168.0.0/16"
- If you want to use the Public IP of the master node,
IPADDR=$(curl ifconfig.me && echo "")
NODENAME=$(hostname -s)
POD_CIDR="192.168.0.0/16"
- Khởi tạo cấu hình master node control plane bằng lệnh kubeadm.
- For a Private IP address-based setup use the following init command.
sudo kubeadm init --apiserver-advertise-address=$IPADDR --apiserver-cert-extra-sans=$IPADDR --pod-network-cidr=$POD_CIDR --node-name $NODENAME
- For Public IP address-based setup use the following init command.
sudo kubeadm init --control-plane-endpoint=$IPADDR --apiserver-cert-extra-sans=$IPADDR --pod-network-cidr=$POD_CIDR --node-name $NODENAME
- Khi khởi tạo kubeadm thành công, bạn sẽ nhận được đầu ra với vị trí tệp kubeconfig và lệnh nối với join command with the token như hiển thị bên dưới. Sao chép nó và lưu nó vào tập tin. chúng ta sẽ cần nó để joining the worker node to the master.
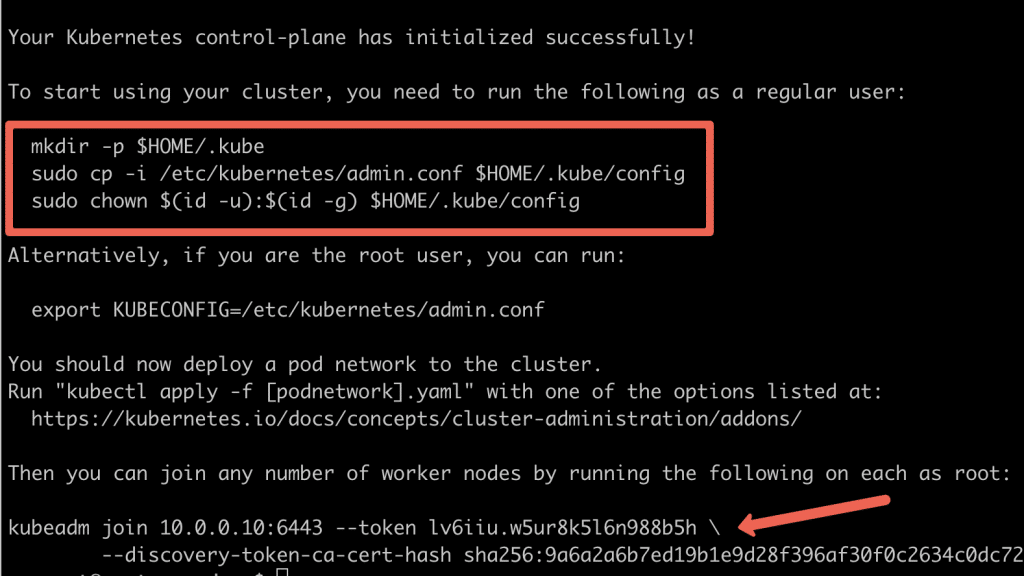
- Use the following commands to create the
kubeconfigin master so that you can usekubectlto interact with cluster API.
mkdir -p $HOME/.kube
sudo cp -i /etc/kubernetes/admin.conf $HOME/.kube/config
sudo chown $(id -u):$(id -g) $HOME/.kube/config
- Bây giờ, hãy xác minh kubeconfig bằng cách thực hiện lệnh kubectl sau để liệt kê tất cả các
podstrong namespacekube-system.
kubectl get po -n kube-system
=> Bạn sẽ thấy đầu ra sau đây. Bạn sẽ thấy hai nhóm Coredns ở trạng thái chờ xử lý. Khi chúng tôi cài đặt plugin mạng, nó sẽ ở trạng thái chạy.

- Bạn xác minh tất cả các trạng thái sức khỏe của thành phần cluster bằng lệnh sau:
kubectl get --raw='/readyz?verbose'
- You can get the cluster info using the following command.
kubectl cluster-info
- Theo mặc định, các ứng dụng sẽ không được lên lịch trên nút chính. Nếu bạn muốn sử dụng nút chính để lên lịch ứng dụng, hãy taint the master node.
kubectl taint nodes --all node-role.kubernetes.io/control-plane-
6. Step 6: Join Worker Nodes To Kubernetes Master Node
- Chúng tôi cũng đã thiết lập cri-o, kubelet và kubeadm trên các node worker.
- Bây giờ, hãy kết nối node worker với node master bằng lệnh Kubeadm mà bạn có ở đầu ra khi thiết lập node master ở bước trên
- If you missed copying the join command, execute the following command in the master node to recreate the token with the join command.
kubeadm token create --print-join-command
- This command performs the TLS bootstrapping for the nodes.
sudo kubeadm join 10.128.0.37:6443 --token j4eice.33vgvgyf5cxw4u8i \
--discovery-token-ca-cert-hash sha256:37f94469b58bcc8f26a4aa44441fb17196a585b37288f85e22475b00c36f1c61
- Now execute the kubectl command from the master node to check if the node is added to the master.
kubectl get nodes
- In the above command, the ROLE is <none> for the worker nodes. You can add a label to the worker node using the following command. Replace worker-node01 with the hostname of the worker node you want to label.
kubectl label node node01 node-role.kubernetes.io/worker=worker
7. Step 7: Install Calico Network Plugin for Pod Networking
- Kubeadm does not configure any network plugin. You need to install a network plugin for kubernetes pod networking and enable network policy => Calico network plugin for this setup.
- Execute the following commands to install the Calico network plugin operator on the cluster.
kubectl apply -f https://docs.projectcalico.org/manifests/calico.yaml
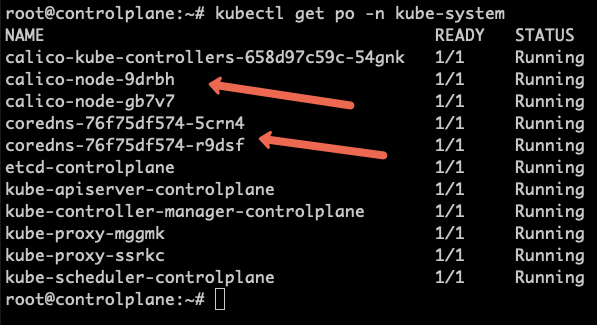
- If you check the pods in
kube-systemnamespace, you will see calico pods and running CoreDNS pods.
kubectl get po -n kube-system
8. Step 8: Setup Kubernetes Metrics Server
- To install the metrics server, execute the following metric server manifest file. It deploys metrics server version v0.6.2
kubectl apply -f https://raw.githubusercontent.com/techiescamp/kubeadm-scripts/main/manifests/metrics-server.yaml
- Once the metrics server objects are deployed, it takes a minute for you to see the node and pod metrics using the top command.
kubectl top nodes
- You can also view the pod CPU and memory metrics using the following command.
kubectl top pod -n kube-system
9. Step 9: Add Kubeadm Config cho máy cá nhân để truy cập vào cluster đã khởi tạo.
Nếu muốn kết nối cụm Kubeadm bằng kubectl từ máy cá nhân của mình, bạn có thể hợp nhất kubeadm admin.conf với tệp kubeconfig hiện có của mình.
Step 1: Copy the contents of admin.conf from the control plane node and save it in a file named kubeadm-config.yaml in your workstation.
Step 2: Take a backup of the existing kubeconfig.
cp ~/.kube/config ~/.kube/config.bak
Step 3: Merge the default config with kubeadm-config.yaml in step 1 and export it to KUBECONFIG variable:
export KUBECONFIG=~/.kube/config:/path/to/kubeadm-config.yaml
Step 4: Merger the configs to a file:
kubectl config view --flatten > ~/.kube/merged_config.yaml
Step 5: Replace the old config with the new config
mv ~/.kube/merged_config.yaml ~/.kube/config
Step 6: List all the contexts
kubectl config get-contexts -o name
Step 7: Set the current context to the kubeadm cluster.
kubectl config use-context <cluster-name-here>
=> Now, you should be able to connect to the Kubeadm cluster from your local workstation kubectl utility.
10. Possible Kubeadm Issues
- Pod Out of memory and CPU: The master node should have a minimum of 2vCPU and 2 GB memory.
- Nodes cannot connect to Master: Check the firewall between nodes and make sure all the nodes can talk to each other on the required kubernetes ports.
- Calico Pod Restarts: Sometimes, if you use the same IP range for the node and pod network, Calico pods may not work as expected. So make sure the node and pod IP ranges don’t overlap.
- For other pod errors, check out the kubernetes pod troubleshooting guide.