
Để hiểu mọi vấn đề liên quan đến container networking. Trong bài viết này, chúng tôi sẽ trả lời các câu hỏi sau:
- Làm cách nào ảo hóa tài nguyên mạng trong máy chủ để khiến các container nghĩ rằng chúng có môi trường mạng riêng lẻ?
- Làm thế nào để biến các container thành hàng xóm và dạy cách giao tiếp với nhau trong hệ thống mạng?
- Làm cách nào để tiếp cận mạng thếgiới bên ngoài (ví dụ: Internet) từ bên trong container?
- Làm cách nào để tiếp cận các container chạy trên máy chủ Linux từ mạng thế giới bên ngoài?
Chúng tôi sẽ thiết lập mạng container trong một máy chủ bằng cách sử dụng các công cụ Linux tiêu chuẩn:
- Network namespaces (netns)
- Virtual Ethernet devices (veth)
- Virtual network switches (bridge)
- IP routing and network address translation (NAT)
1. Tạo container đầu tiên sử dụng network namespace (netns)
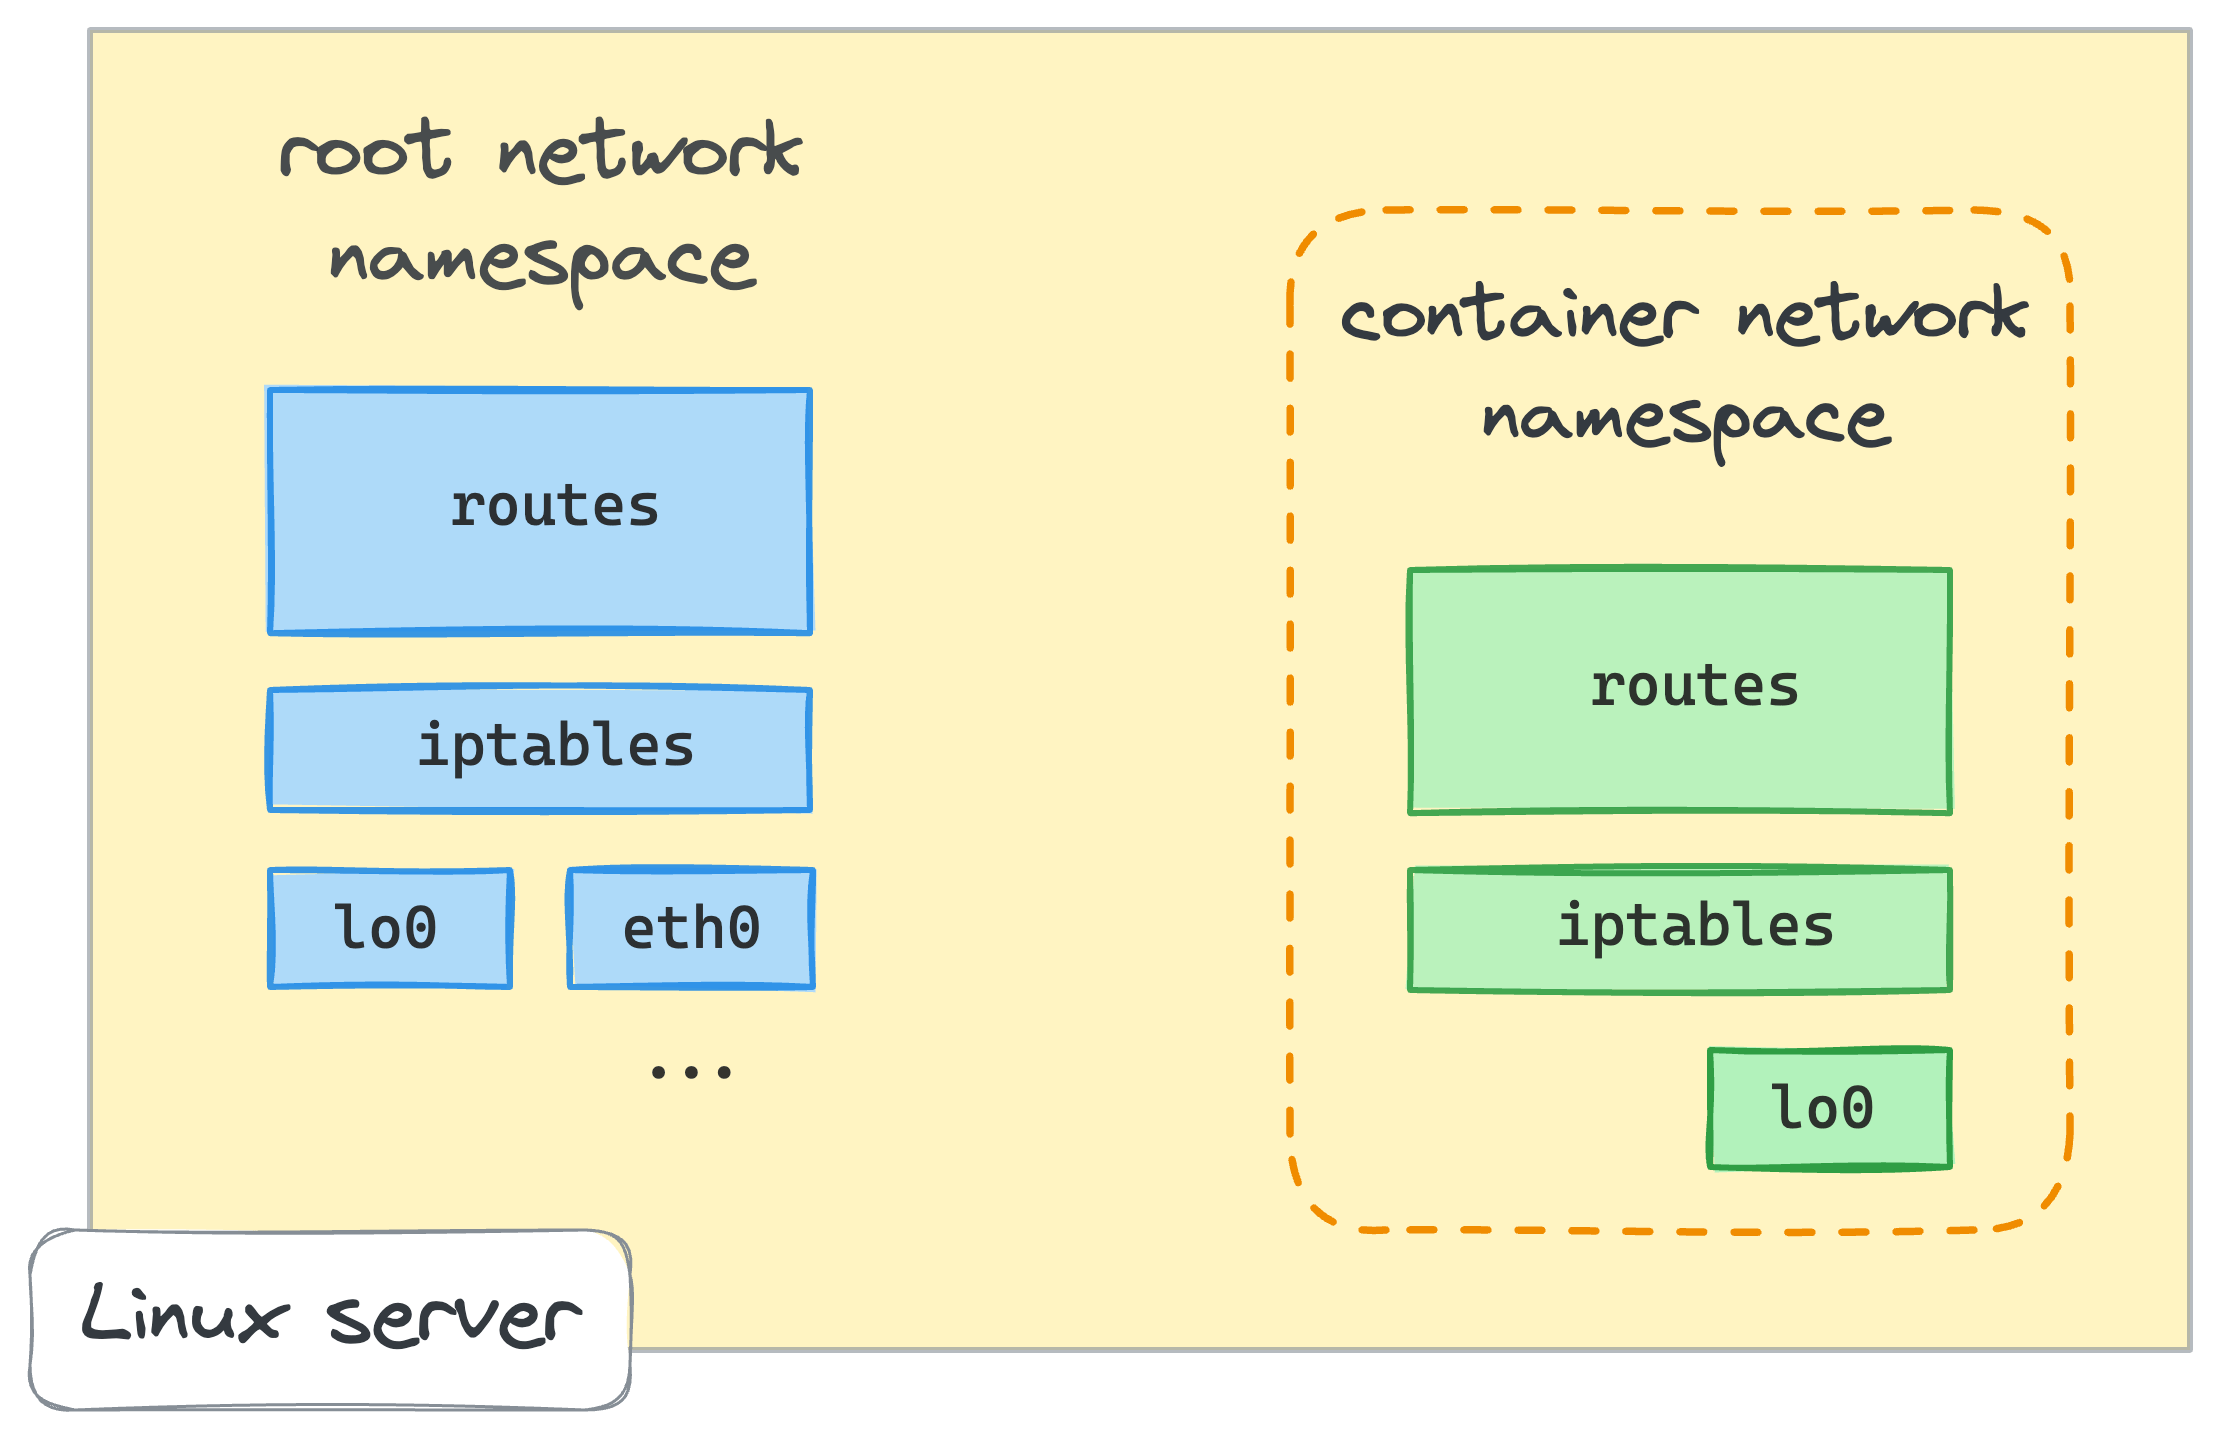
- Network namespace được giải thích là một bản sao khác của network stack, với các định tuyến, quy tắc tường lửa và thiết bị mạng riêng.
- One of the ways to create a network namespace in Linux is to use the
ip netns addcommand
ip netns add netns0
- To check that the new namespace has been added to the system, run the following command:
ip netns list
- Làm cách nào để bắt đầu sử dụng Network namespace vừa tạo? Có một tiện ích Linux tiện dụng khác gọi là nsenter. Nó nhập một hoặc nhiều Network namespace được chỉ định và sau đó thực thi chương trình đã cho trong đó. Ví dụ: đây là cách chúng ta có thể bắt đầu phiên shell mới bên trong Network namespace tên netns0 vừa tạo:
nsenter --net=/run/netns/netns0 bash
2. Connecting containers to host using virtual Ethernet devices (veth)
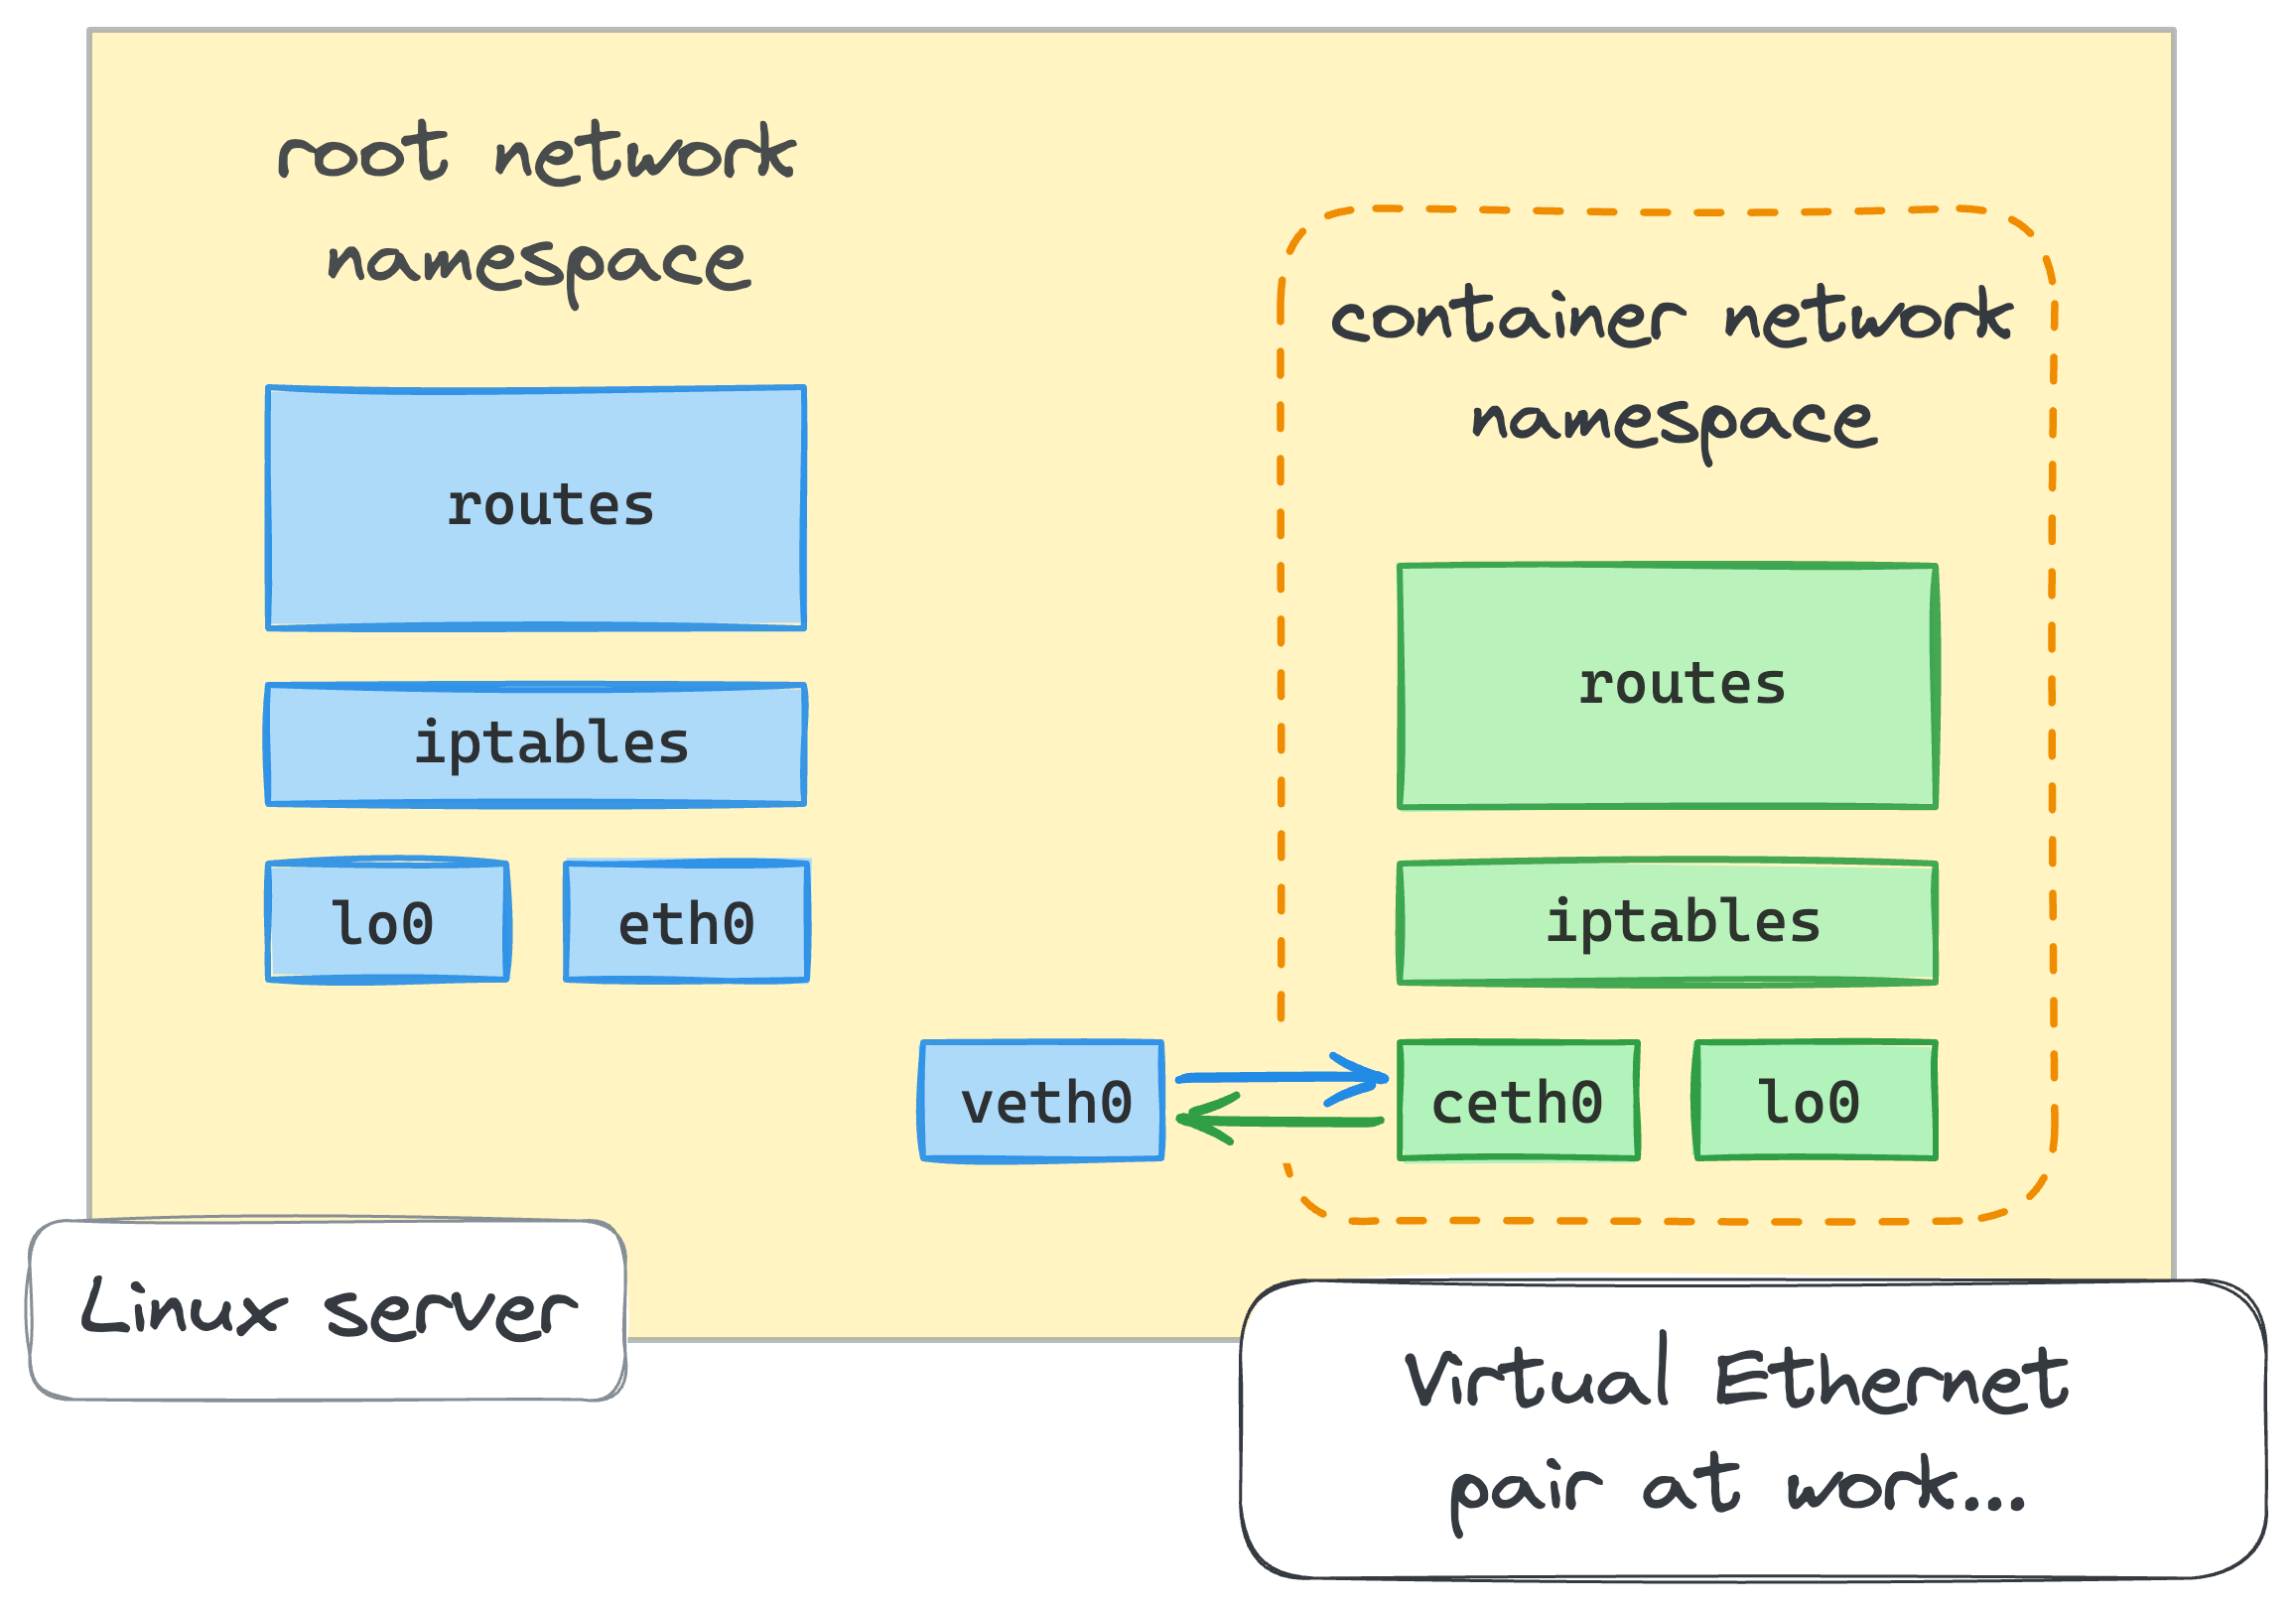
- Một môi trường mạng bị cô lập giống như container network sẽ không hữu ích nếu chúng ta không thể giao tiếp với nó. May mắn thay, Linux cung cấp một phương tiện đặc biệt để kết nối giữa các Network namespace – một Ethernet ảo hoặc veth.
- Virtual Ethernet devices hay veth hoạt động như các đường hầm giữa các Network namespace để tạo cầu nối tới thiết bị mạng của một Network namespace khác.
- Virtual Ethernet devices luôn đi theo cặp. Đừng lo lắng nếu nó nghe có vẻ hơi khó hiểu, mọi chuyện sẽ rõ ràng khi chúng ta xem ví dụ cụ thể ở dưới.
- From the root network namespace, let’s create a pair of virtual Ethernet devices:
ip link add veth0 type veth peer name ceth0
- With this single command, we just created a pair of interconnected virtual Ethernet devices. The names
veth0andceth0have been chosen arbitrarily:
ip link list
1: lo: <LOOPBACK,UP,LOWER_UP> mtu 65536 qdisc noqueue state UNKNOWN mode DEFAULT group default qlen 1000

link/loopback 00:00:00:00:00:00 brd 00:00:00:00:00:00

...

4: eth0: <BROADCAST,MULTICAST,UP,LOWER_UP> mtu 1500 qdisc pfifo_fast state UP mode DEFAULT group default qlen 1000

link/ether 92:b2:3d:42:ed:22 brd ff:ff:ff:ff:ff:ff

5: ceth0@veth0: <BROADCAST,MULTICAST,M-DOWN> mtu 1500 qdisc noop state DOWN mode DEFAULT group default qlen 1000

link/ether b2:d3:e4:24:c3:f1 brd ff:ff:ff:ff:ff:ff

6: veth0@ceth0: <BROADCAST,MULTICAST,M-DOWN> mtu 1500 qdisc noop state DOWN mode DEFAULT group default qlen 1000

link/ether 4e:ac:e0:3c:d8:6e brd ff:ff:ff:ff:ff:ff
- Cả veth0 và ceth0 sau khi tạo đều nằm trong mạng của máy chủ – tức là trong root network namespace. Để kết nối root network namespace với network namespace netns0 mà chúng ta đã tạo trước đó, chúng ta cần giữ một trong các thiết bị trong root network namespace và di chuyển một thiết bị khác vào netns0:
ip link set ceth0 netns netns0
(đã di chuyển ceth0 vào trong network namespace netns0)
- Let’s make sure one of the devices disappeared from the root networking context:
ip link list
kết quả:
1: lo: <LOOPBACK,UP,LOWER_UP> mtu 65536 qdisc noqueue state UNKNOWN mode DEFAULT group default qlen 1000

link/loopback 00:00:00:00:00:00 brd 00:00:00:00:00:00

...

4: eth0: <BROADCAST,MULTICAST,UP,LOWER_UP> mtu 1500 qdisc pfifo_fast state UP mode DEFAULT group default qlen 1000

link/ether 92:b2:3d:42:ed:22 brd ff:ff:ff:ff:ff:ff

6: veth0@if5: <BROADCAST,MULTICAST> mtu 1500 qdisc noop state DOWN mode DEFAULT group default qlen 1000

link/ether 4e:ac:e0:3c:d8:6e brd ff:ff:ff:ff:ff:ff link-netns netns0
- Đặt IP cho các card mạng đã gắn vào các network namespace
- Let’s start from the root namespace:
*Enable: ip link set veth0 up
*Assigned IP to veth0 device: ip addr add 172.18.0.11/16 dev veth0
- Continue in the netns0 namespace
nsenter --net=/run/netns/netns0 bash
*In the new shell session that runs in the netns0 namespace:
ip link list
*Kết quả:
1: lo: <LOOPBACK> mtu 65536 qdisc noop state DOWN mode DEFAULT group default qlen 1000

link/loopback 00:00:00:00:00:00 brd 00:00:00:00:00:00

5: ceth0@if6: <BROADCAST,MULTICAST> mtu 1500 qdisc noop state DOWN mode DEFAULT group default qlen 1000

link/ether da:08:47:8b:8f:c7 brd ff:ff:ff:ff:ff:ff link-netnsid 0
*Seem like the loopback device and ceth0 is down in new namespaces, so we need to turn it on first:
ip link set lo up
ip link set ceth0 up
*Assgin IP in ceth0
ip addr add 172.18.0.10/16 dev ceth0
- Let’s try to ping the veth0 device from the netns0 namespace:
ping -c 2 172.18.0.11
PING 172.18.0.11 (172.18.0.11) 56(84) bytes of data.

64 bytes from 172.18.0.11: icmp_seq=1 ttl=64 time=0.093 ms

64 bytes from 172.18.0.11: icmp_seq=2 ttl=64 time=0.075 ms
- Try to ping the ceth0 device from the root namespace:
ping -c 2 172.18.0.10
PING 172.18.0.10 (172.18.0.10) 56(84) bytes of data.

64 bytes from 172.18.0.10: icmp_seq=1 ttl=64 time=0.012 ms

64 bytes from 172.18.0.10: icmp_seq=2 ttl=64 time=0.078 ms
=> Success! We’ve just got packets flowing between the root namespace and the netns0 namespace.
- Nhưng điều gì sẽ xảy ra nếu chúng ta cố gắng truy cập bất kỳ địa chỉ nào khác từ namespace netns0?
ip addr show dev eth0
eth0: <BROADCAST,MULTICAST,UP,LOWER_UP> mtu 1500 qdisc pfifo_fast state UP group default qlen 1000

link/ether ee:36:69:36:fe:bd brd ff:ff:ff:ff:ff:ff

inet 172.16.0.2/16 brd 172.16.255.255 scope global eth0

valid_lft forever preferred_lft forever

inet6 fe80::b0b9:11ff:fe79:613f/64 scope link

valid_lft forever preferred_lft forever
- Note this 172.16.0.2 address – it’s the IP address of another network interface on host, and we are going to use it to check the connectivity from the netns0 namespace, access netns0 namespace:
nsenter --net=/run/netns/netns0 bash
ping 172.16.0.2
ping: connect: Network is unreachable
- What if we try something from the Internet?
ping: connect: Network is unreachable
- The failure is easy to explain, though. There is simply no record in the netns0 routing table for such packets. The only entry there shows how to reach the 172.18.0.0/16 network:
ip route list
172.18.0.0/16 dev ceth0 proto kernel scope link src 172.18.0.10
Như vậy mọi packet từ netns0 namespace đến dải 172.18.0.0/16 đều phải đi qua ceth0 device.
- Tương tự, new route was added to the root namespace.
ip route list
... omitted lines ...

172.18.0.0/16 dev veth0 proto kernel scope link src 172.18.0.11
3. Tạo second container tương tự các bước đã thực hiện
- From the root namespace, adding another “container”:
ip netns add netns1
ip link add veth1 type veth peer name ceth1

ip link set veth1 up

ip addr add 172.18.0.21/16 dev veth1
ip link set ceth1 netns netns1
- Truy cập vào bên trong container network vừa taọ
nsenter --net=/run/netns/netns1 bash
*Chạy các comand khởi động network device và gắn IP:
ip link set lo up
ip link set ceth1 up
ip addr add 172.18.0.20/16 dev ceth1
- Checking the connectivity to veth1 in root namespace (from the netns1 namespace):
ping -c 2 172.18.0.21
--- 172.18.0.21 ping statistics ---

2 packets transmitted, 0 received, 100% packet loss, time 1023ms
We did everything the same way as before, but the connectivity is broken. From netns1 we cannot reach the root namespace.
- What if we try to ping the ceth1 device from the root namespace?
ping -c 2 172.18.0.20
--- 172.18.0.20 ping statistics --- 2 packets transmitted, 0 received, +2 errors, 100% packet loss, time 1014ms pipe 2
- At the same time, from first container (netns0) we reach the host’s end of the new container (veth1):
nsenter --net=/run/netns/netns0 bash
ping -c 2 172.18.0.21
PING 172.18.0.21 (172.18.0.21) 56(84) bytes of data.

64 bytes from 172.18.0.21: icmp_seq=1 ttl=64 time=0.037 ms

64 bytes from 172.18.0.21: icmp_seq=2 ttl=64 time=0.046 ms
--- 172.18.0.21 ping statistics ---

2 packets transmitted, 2 received, 0% packet loss, time 33ms

rtt min/avg/max/mdev = 0.037/0.041/0.046/0.007 ms
But we still cannot reach netns1:
ping -c 2 172.18.0.20
--- 172.18.0.20 ping statistics ---

2 packets transmitted, 0 received, +2 errors, 100% packet loss, time 63ms

pipe 2
- Có vẻ như chúng ta đang phải đối mặt với sự xung đột về các tuyến đường. Hãy kiểm tra bảng định tuyến trong root namespace:
ip route list
... omitted lines ...

172.18.0.0/16 dev veth0 proto kernel scope link src 172.18.0.11

172.18.0.0/16 dev veth1 proto kernel scope link src 172.18.0.21
172.18.0.0/16 dev veth1 proto kernel scope link src 172.18.0.21 mới, nhưng đã có một tuyến đường hiện có cho cùng một mạng 172.18.0.0/16. Khi vùng chứa thứ hai cố gắng ping thiết bị veth1, tuyến đầu tiên sẽ được chọn và điều này sẽ ngắt kết nối. Nếu chúng ta xóa tuyến đầu tiên (ip route delete 172.18.0.0/16 dev veth0 proto kernel scope link src 172.18.0.11) và kiểm tra lại kết nối, tình hình sẽ đảo ngược – netns0 sẽ ở trạng thái mất kết nối và netns1 sẽ có thể ping thiết bị veth0 của máy chủ.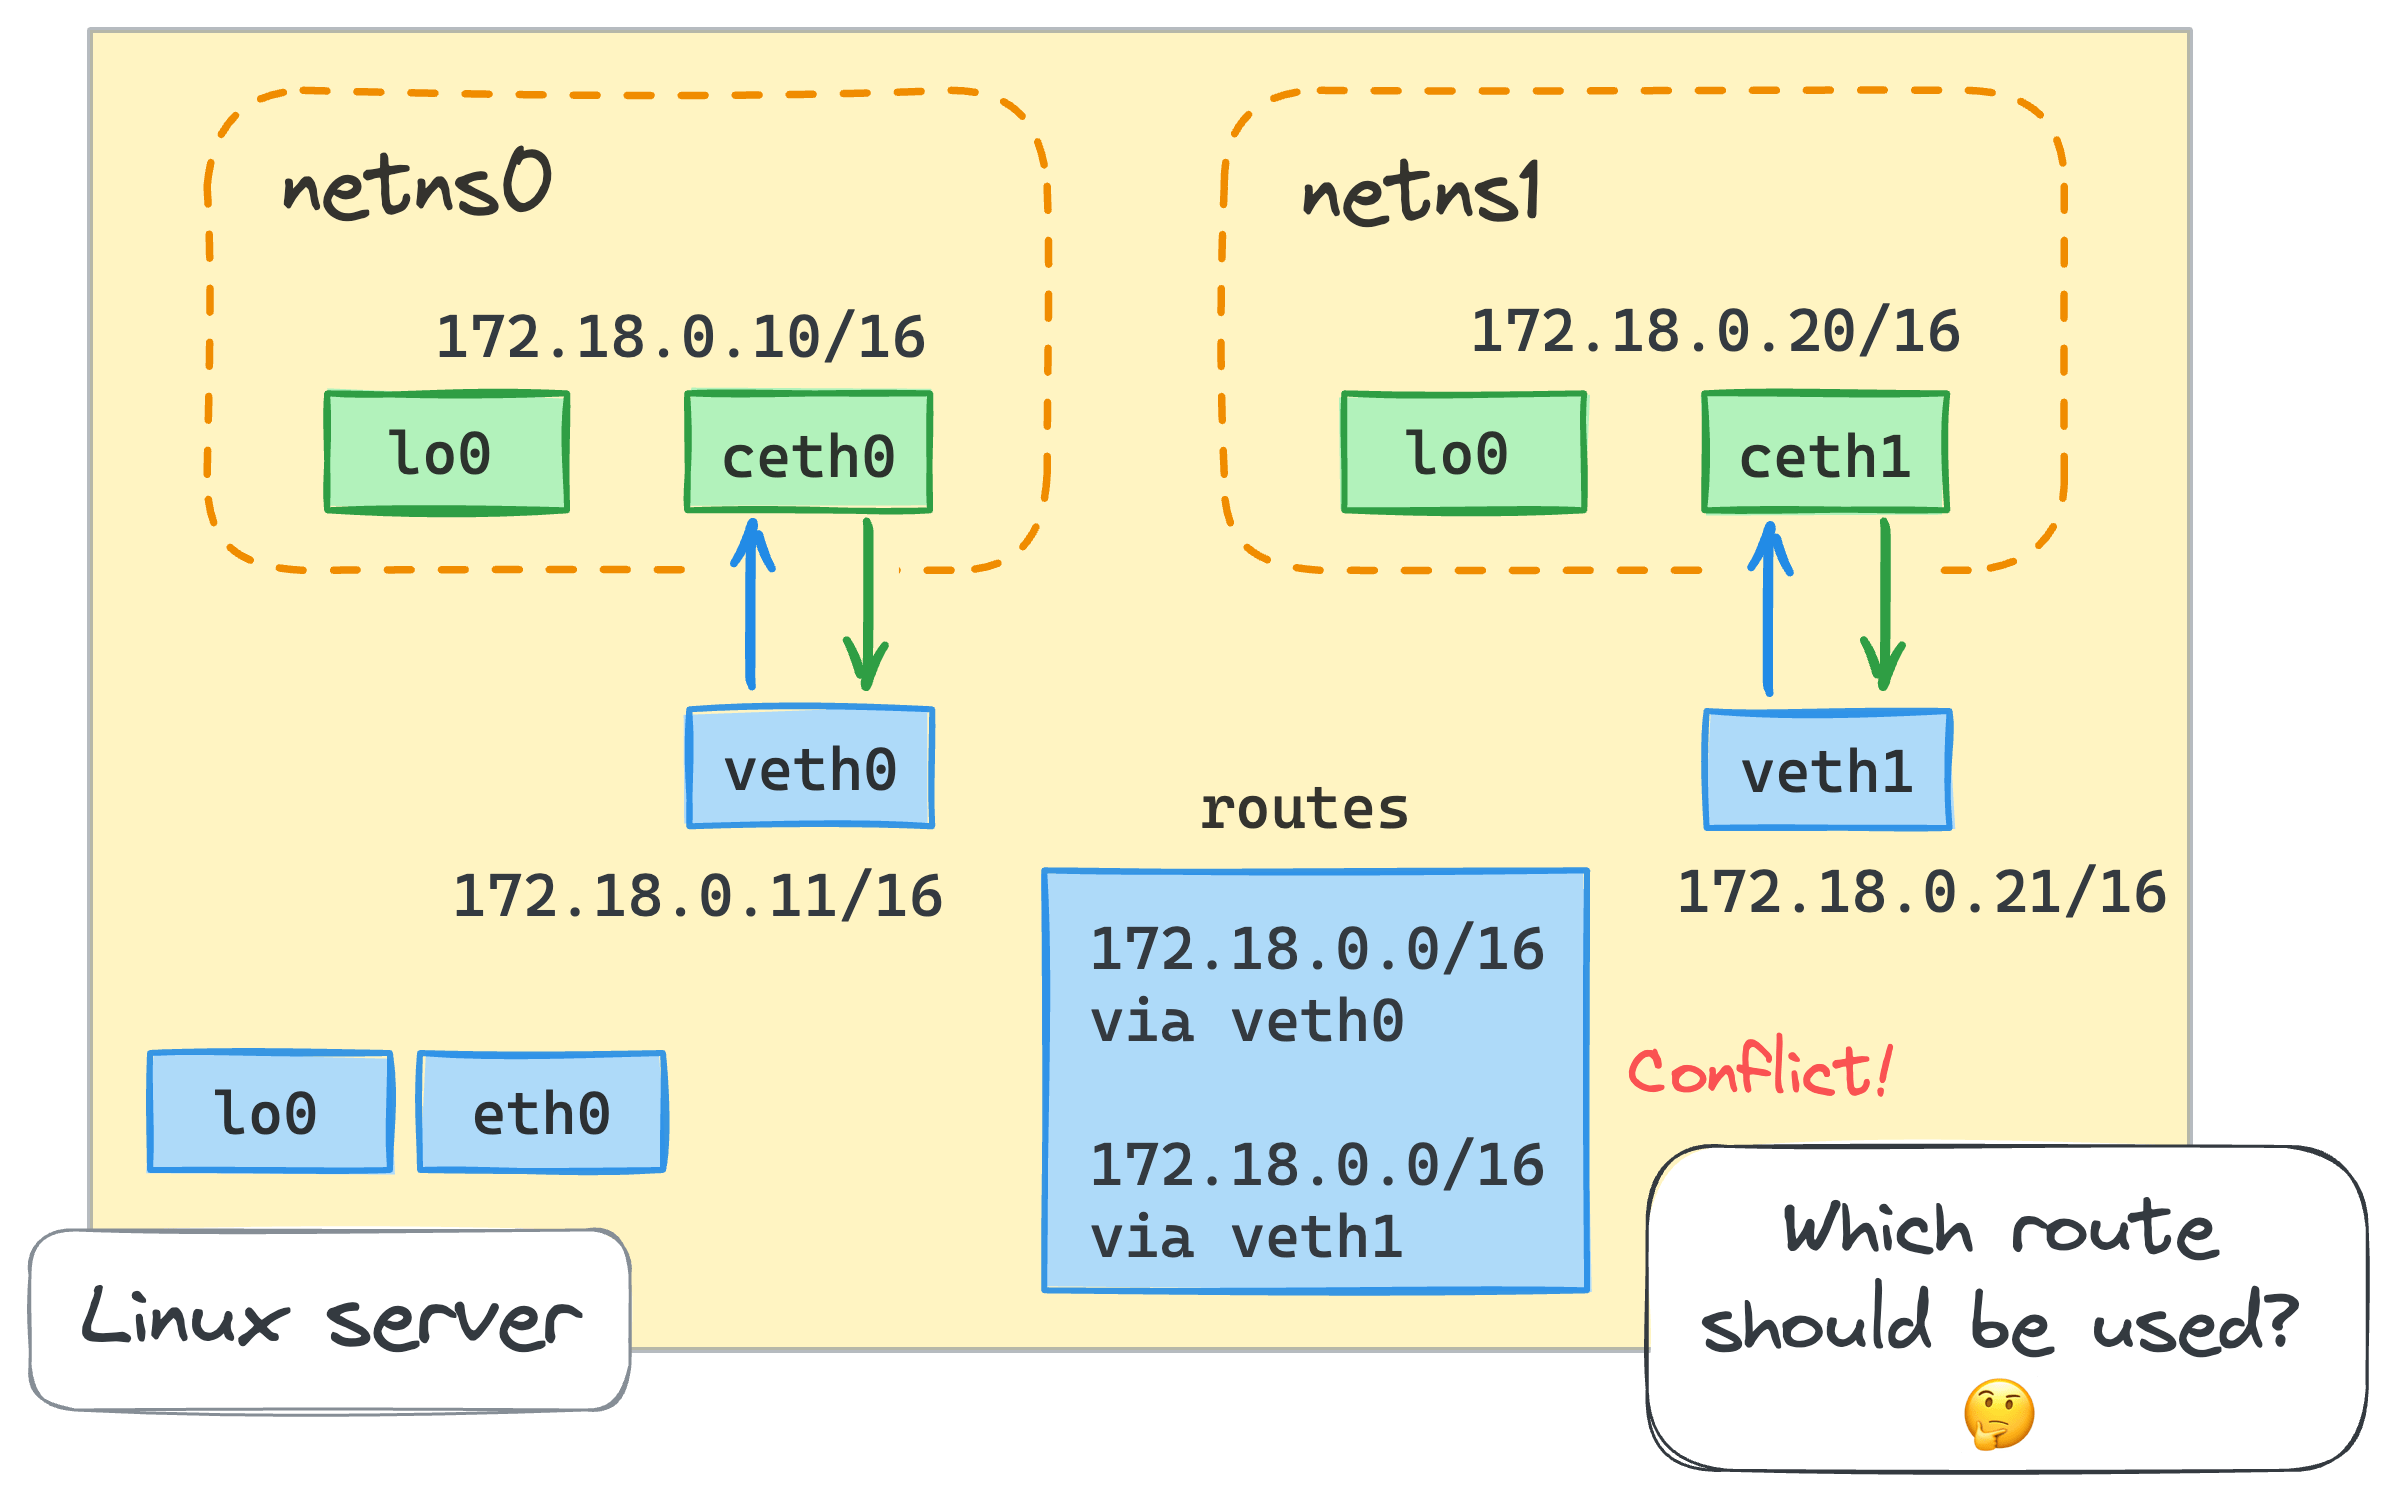
bridge device hoạt động giống như một switch network. Nó chuyển tiếp các gói giữa các interfaces được kết nối với nó. Và vì nó là bộ chuyển mạch chứ không phải bộ định tuyến nên nó không quan tâm đến địa chỉ IP của các thiết bị được kết nối vì nó hoạt động ở cấp độ L2 (tức là Ethernet).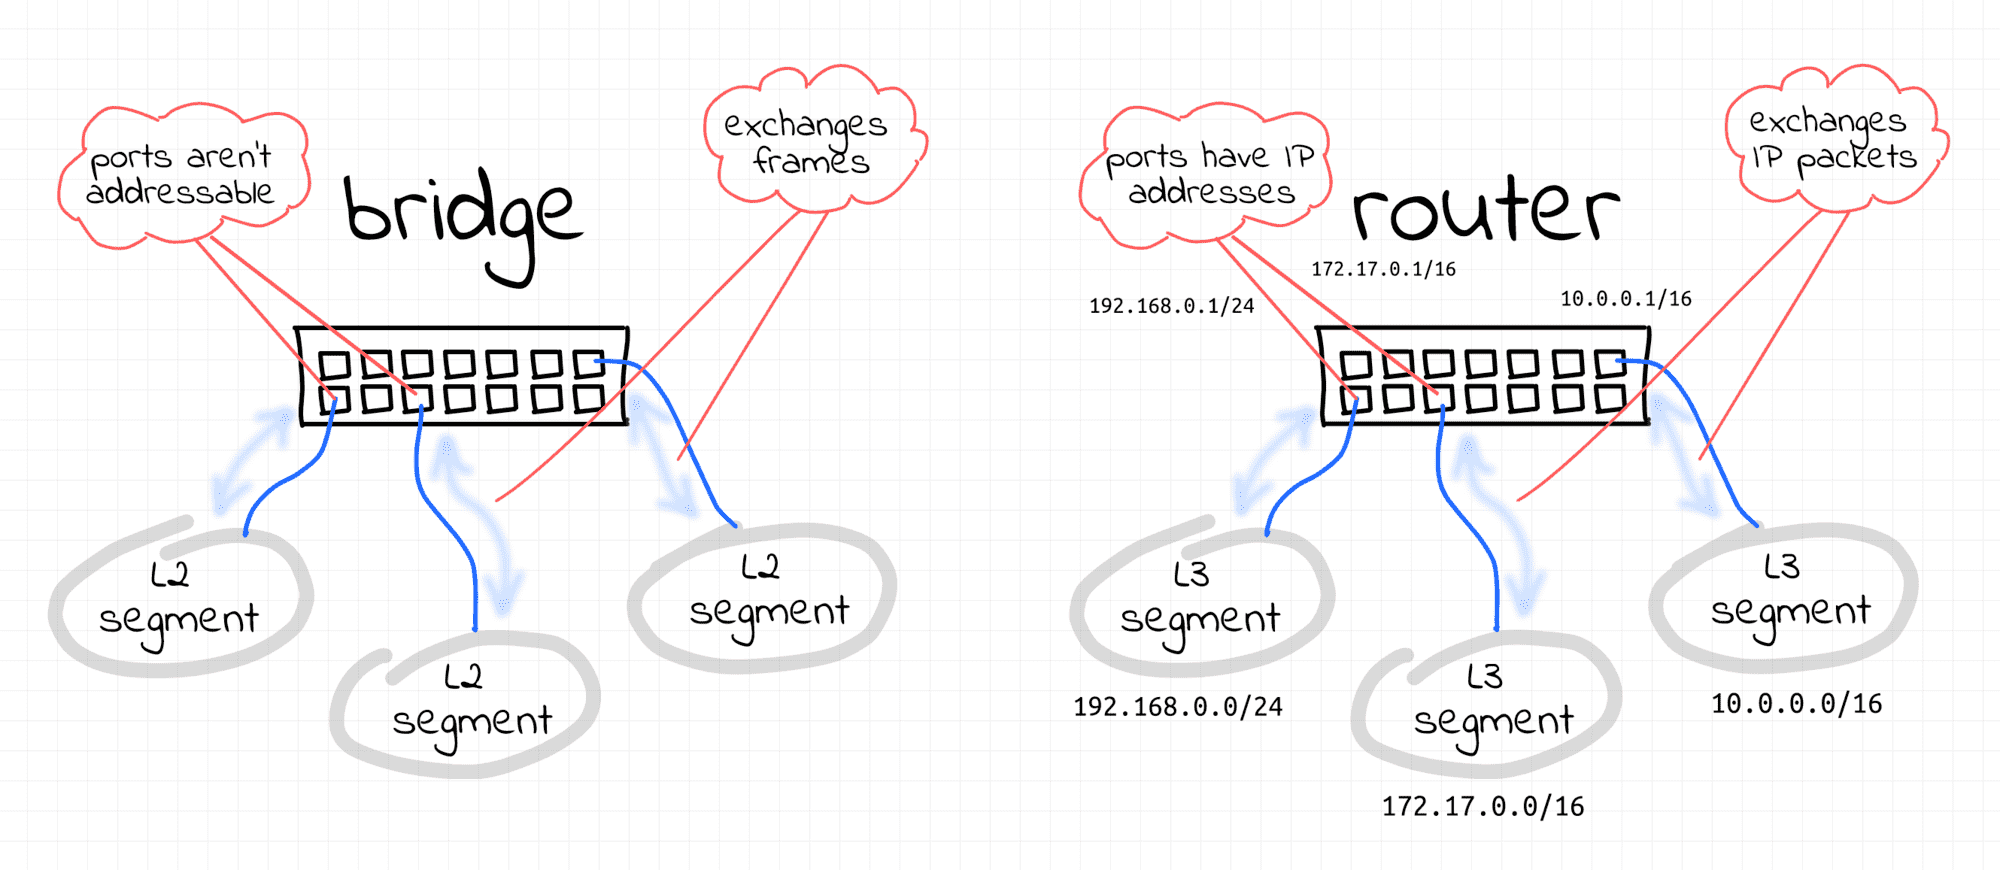
ip netns add netns0ip link add veth0 type veth peer name ceth0
ip link set veth0 up
ip link set ceth0 netns netns0netns0 namespace:nsenter --net=/run/netns/netns0 baship link set lo up
ip link set ceth0 up
ip addr add 172.18.0.10/16 dev ceth0
ip netns add netns1ip link add veth1 type veth peer name ceth1
ip link set veth1 up
ip link set ceth1 netns netns1netns1 namespace:nsenter --net=/run/netns/netns1 baship link set lo up
ip link set ceth1 up
ip addr add 172.18.0.20/16 dev ceth1ip route listdefault via 172.16.0.1 dev eth0
172.16.0.0/16 dev eth0 proto kernel scope link src 172.16.0.2
– Now we are ready to create a bridge device:ip link add br0 type bridge
ip link set br0 up
– When the bridge is created, we need to connect the containers to it by attaching the host’s ends (veth0 and veth1) of their veth pairs:ip link set veth0 master br0
ip link set veth1 master br0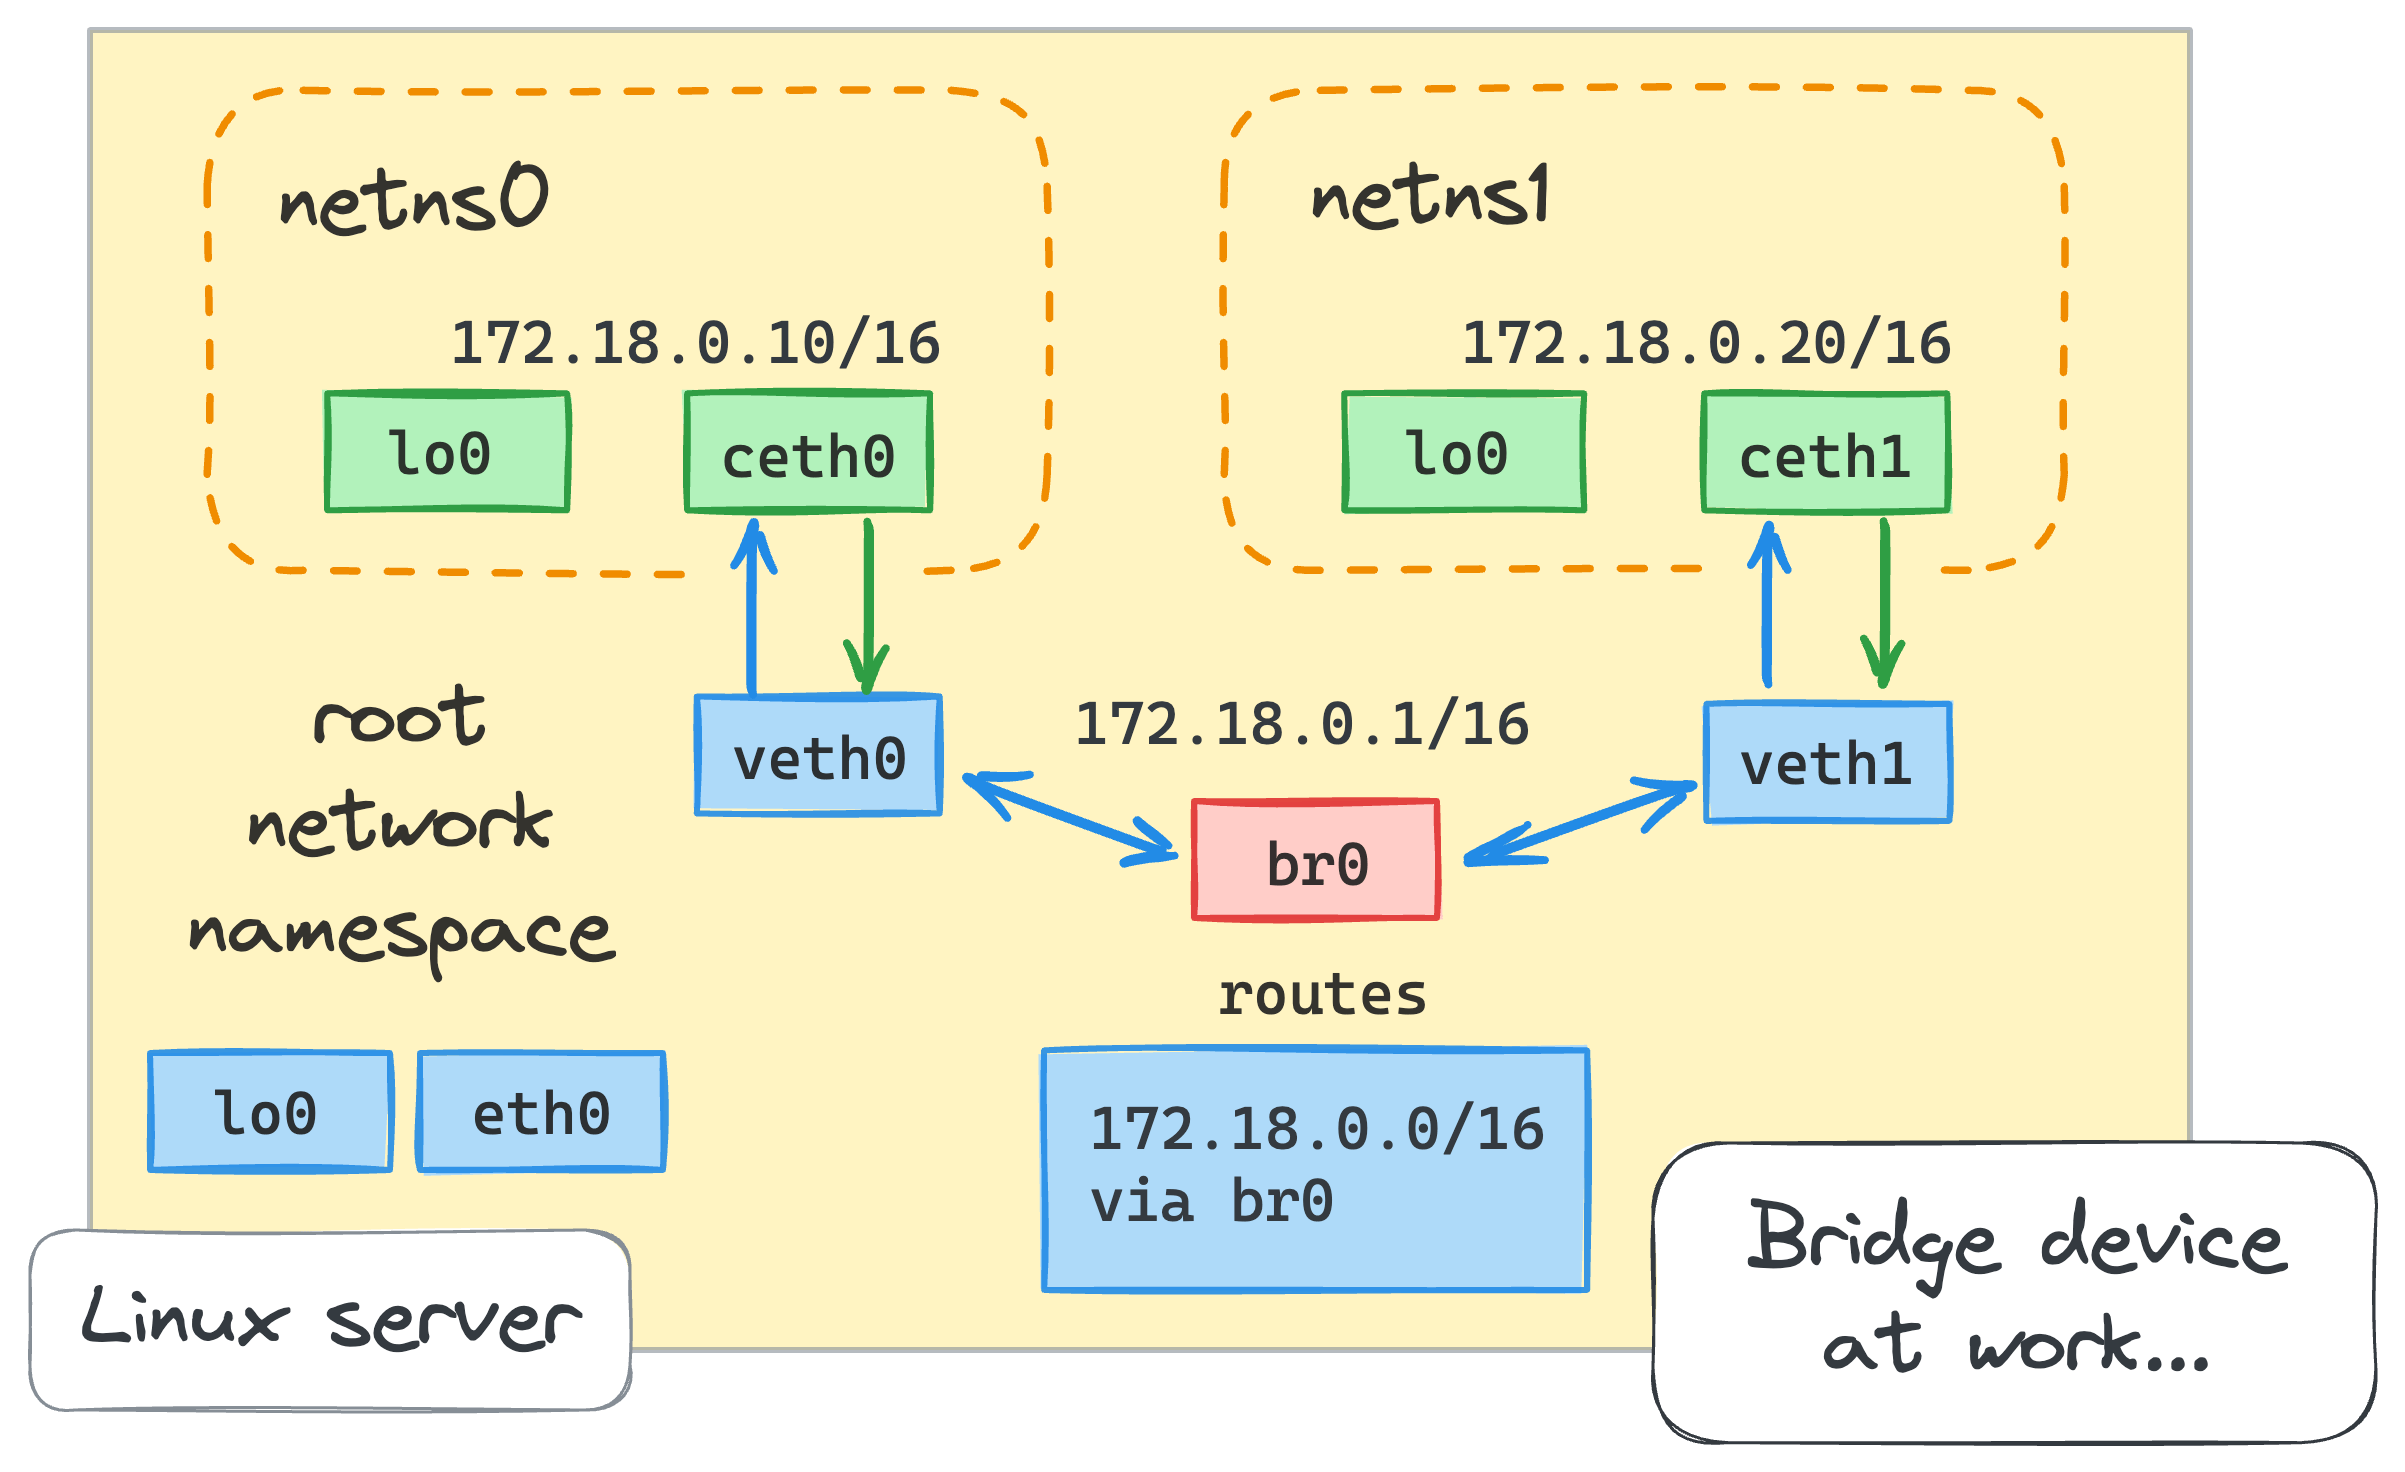
First container to the second:
nsenter --net=/run/netns/netns0 ping -c 2 172.18.0.20PING 172.18.0.20 (172.18.0.20) 56(84) bytes of data.
64 bytes from 172.18.0.20: icmp_seq=1 ttl=64 time=0.295 ms
64 bytes from 172.18.0.20: icmp_seq=2 ttl=64 time=0.053 msnsenter --net=/run/netns/netns1 ping -c 2 172.18.0.10PING 172.18.0.10 (172.18.0.10) 56(84) bytes of data.
64 bytes from 172.18.0.10: icmp_seq=1 ttl=64 time=0.052 ms
64 bytes from 172.18.0.10: icmp_seq=2 ttl=64 time=0.103 msnsenter --net=/run/netns/netns0 ping -c 2 172.16.0.2 # host's eth0 addressping: connect: Network is unreachablensenter --net=/run/netns/netns0 ip route list172.18.0.0/16 dev ceth0 proto kernel scope link src 172.18.0.10ping -c 2 172.18.0.10--- 172.18.0.10 ping statistics ---
2 packets transmitted, 0 received, 100% packet loss, time 1007msping -c 2 172.18.0.20--- 172.18.0.20 ping statistics ---
2 packets transmitted, 0 received, 100% packet loss, time 1016msip addr add 172.18.0.1/16 dev br0ip route list... omitted lines ...
172.18.0.0/16 dev br0 proto kernel scope link src 172.18.0.1
– Now, the root namespace should be able to ping the another containers.PING 172.18.0.10 (172.18.0.10) 56(84) bytes of data.
64 bytes from 172.18.0.10: icmp_seq=1 ttl=64 time=0.141 ms
64 bytes from 172.18.0.10: icmp_seq=2 ttl=64 time=0.081 msPING 172.18.0.20 (172.18.0.20) 56(84) bytes of data.
64 bytes from 172.18.0.20: icmp_seq=1 ttl=64 time=0.048 ms
64 bytes from 172.18.0.20: icmp_seq=2 ttl=64 time=0.083 msnsenter --net=/run/netns/netns0 \
ip route add default via 172.18.0.1 # i.e. via the bridge interface
nsenter --net=/run/netns/netns1 \

ip route add default via 172.18.0.1 # i.e. via the bridge interface
nsenter --net=/run/netns/netns0 ping -c 2 172.16.0.2
PING 172.16.0.2 (172.16.0.2) 56(84) bytes of data.

64 bytes from 172.16.0.2: icmp_seq=1 ttl=64 time=0.035 ms

64 bytes from 172.16.0.2: icmp_seq=2 ttl=64 time=0.036 ms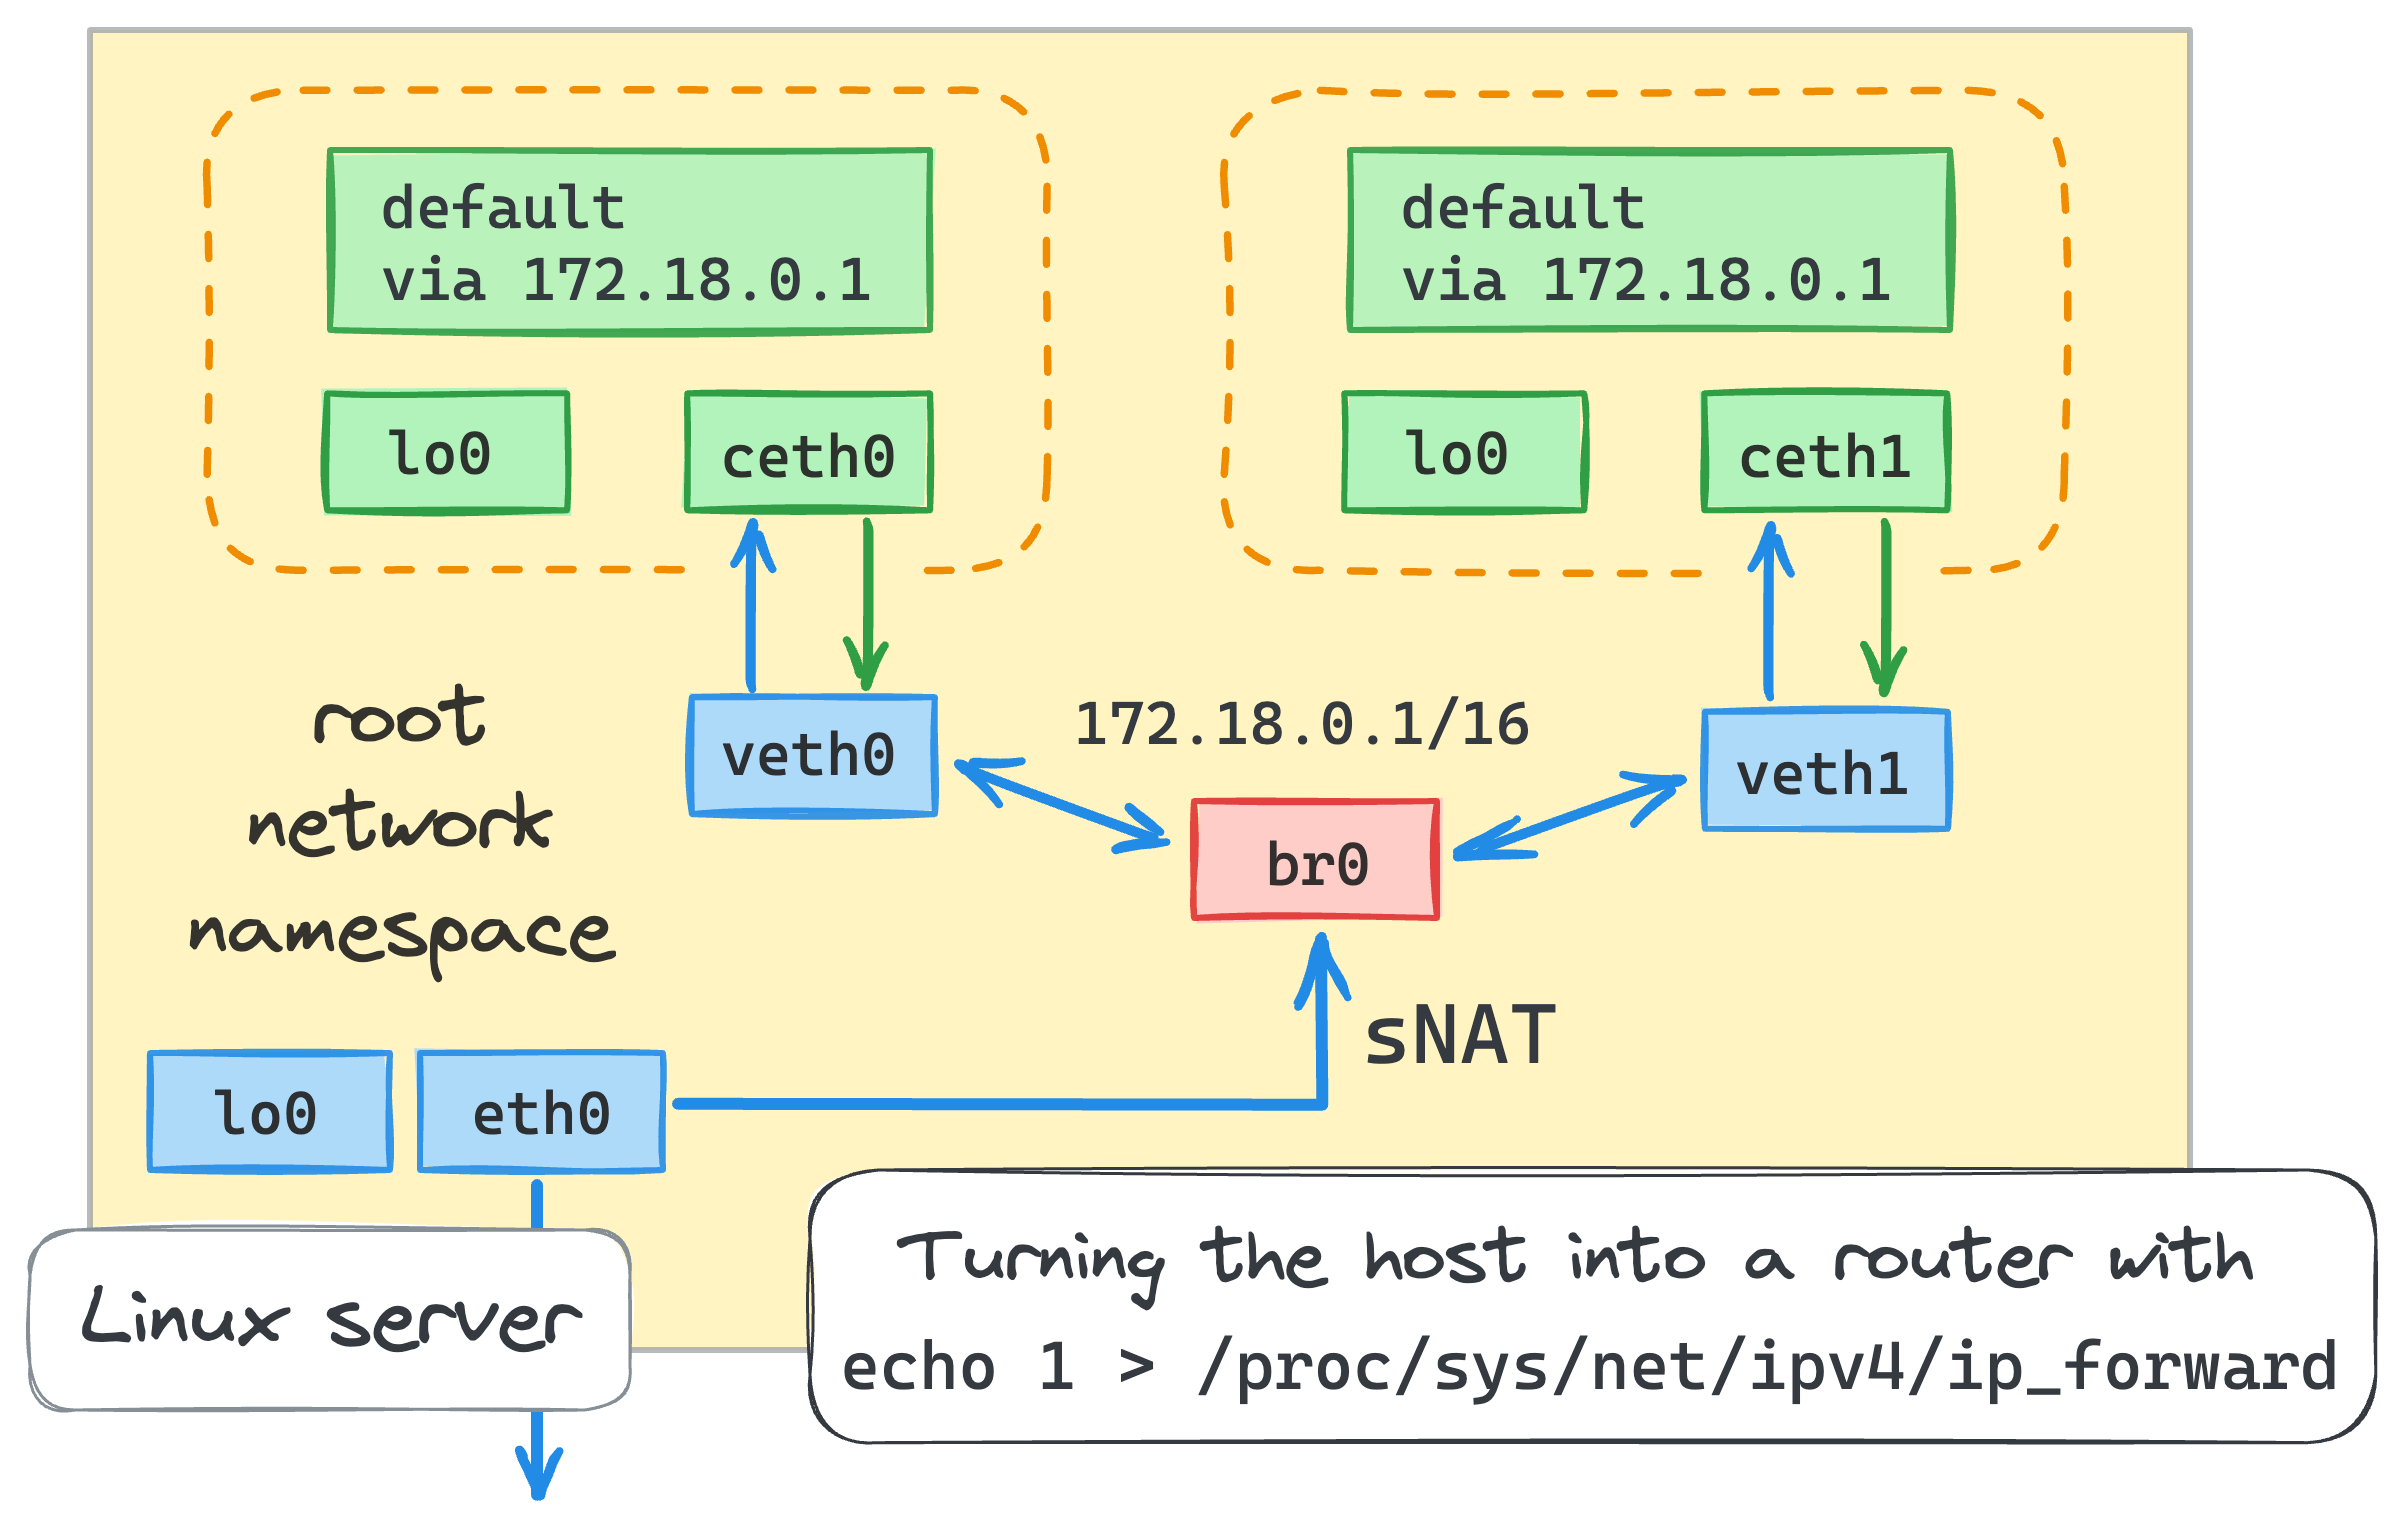
echo 1 > /proc/sys/net/ipv4/ip_forwardnsenter --net=/run/netns/netns0 ping -c 2 8.8.8.82 packets transmitted, 0 received, 100% packet loss, time 1018msthế địa chỉ IP nội bộ bằng địa chỉ IP giao diện bên ngoài của máy chủ. Máy chủ cũng sẽ theo dõi tất cả các package đến và nó sẽ khôi phục địa chỉ IP trước khi chuyển tiếp các gói trở lại container. Nhờ iptables, chúng ta chỉ cần một lệnh duy nhất để thực hiện việc NAT IP:iptables -t nat -A POSTROUTING -s 172.18.0.0/16 ! -o br0 -j MASQUERADE
nsenter --net=/run/netns/netns0 ping -c 2 8.8.8.8PING 8.8.8.8 (8.8.8.8) 56(84) bytes of data.
64 bytes from 8.8.8.8: icmp_seq=1 ttl=115 time=9.29 ms
64 bytes from 8.8.8.8: icmp_seq=2 ttl=115 time=7.72 msiptables -t nat -A PREROUTING \
-d 172.16.0.2 -p tcp -m tcp --dport 5000 \
-j DNAT --to-destination 172.18.0.10:5000iptables -t nat -A OUTPUT \
-d 172.16.0.2 -p tcp -m tcp --dport 5000 \
-j DNAT --to-destination 172.18.0.10:5000
– Additionally, we need to enable iptables intercepting traffic over bridged networks:modprobe br_netfilter